I was neck-deep into the block system during the months leading up to its debut in 2018. This also just happened to coincide with the first November I had ever completed National Novel Writing Month, a 30-day challenge to write a 50,000-word first draft of a novel. I have since won a second time in 2021.
As a starry-eyed, wanna-be novelist, one of the first things that excited me about the block system was how writers could show off their books with WordPress. Of course, I had no choice but to create a custom grouping of blocks to show off the manuscript I had somehow managed to hammer out in a month.
This was the pre-pattern era of WordPress. The interface was clunky. Things seemed to break at random. Design tools were almost non-existent, but there was a bit of magic in the air. At no point in the platform’s history could users visually build such a simple layout with stock WordPress. For all its faults during the beta run, this was the moment that I became a block fanboy.
It was not until months later that I released the theme for novelists — it was a child of another project that had yet to launch.
For this entry in the Building with Blocks series, I wanted to walk readers through creating one of the patterns that inspired me to continue designing and developing with the block system. As a bonus, I will also show how to create a book review pattern.
I am using the Archeo theme by Automattic throughout this tutorial. However, it should work with any theme that supports blocks. You will also get more mileage out of a block theme.
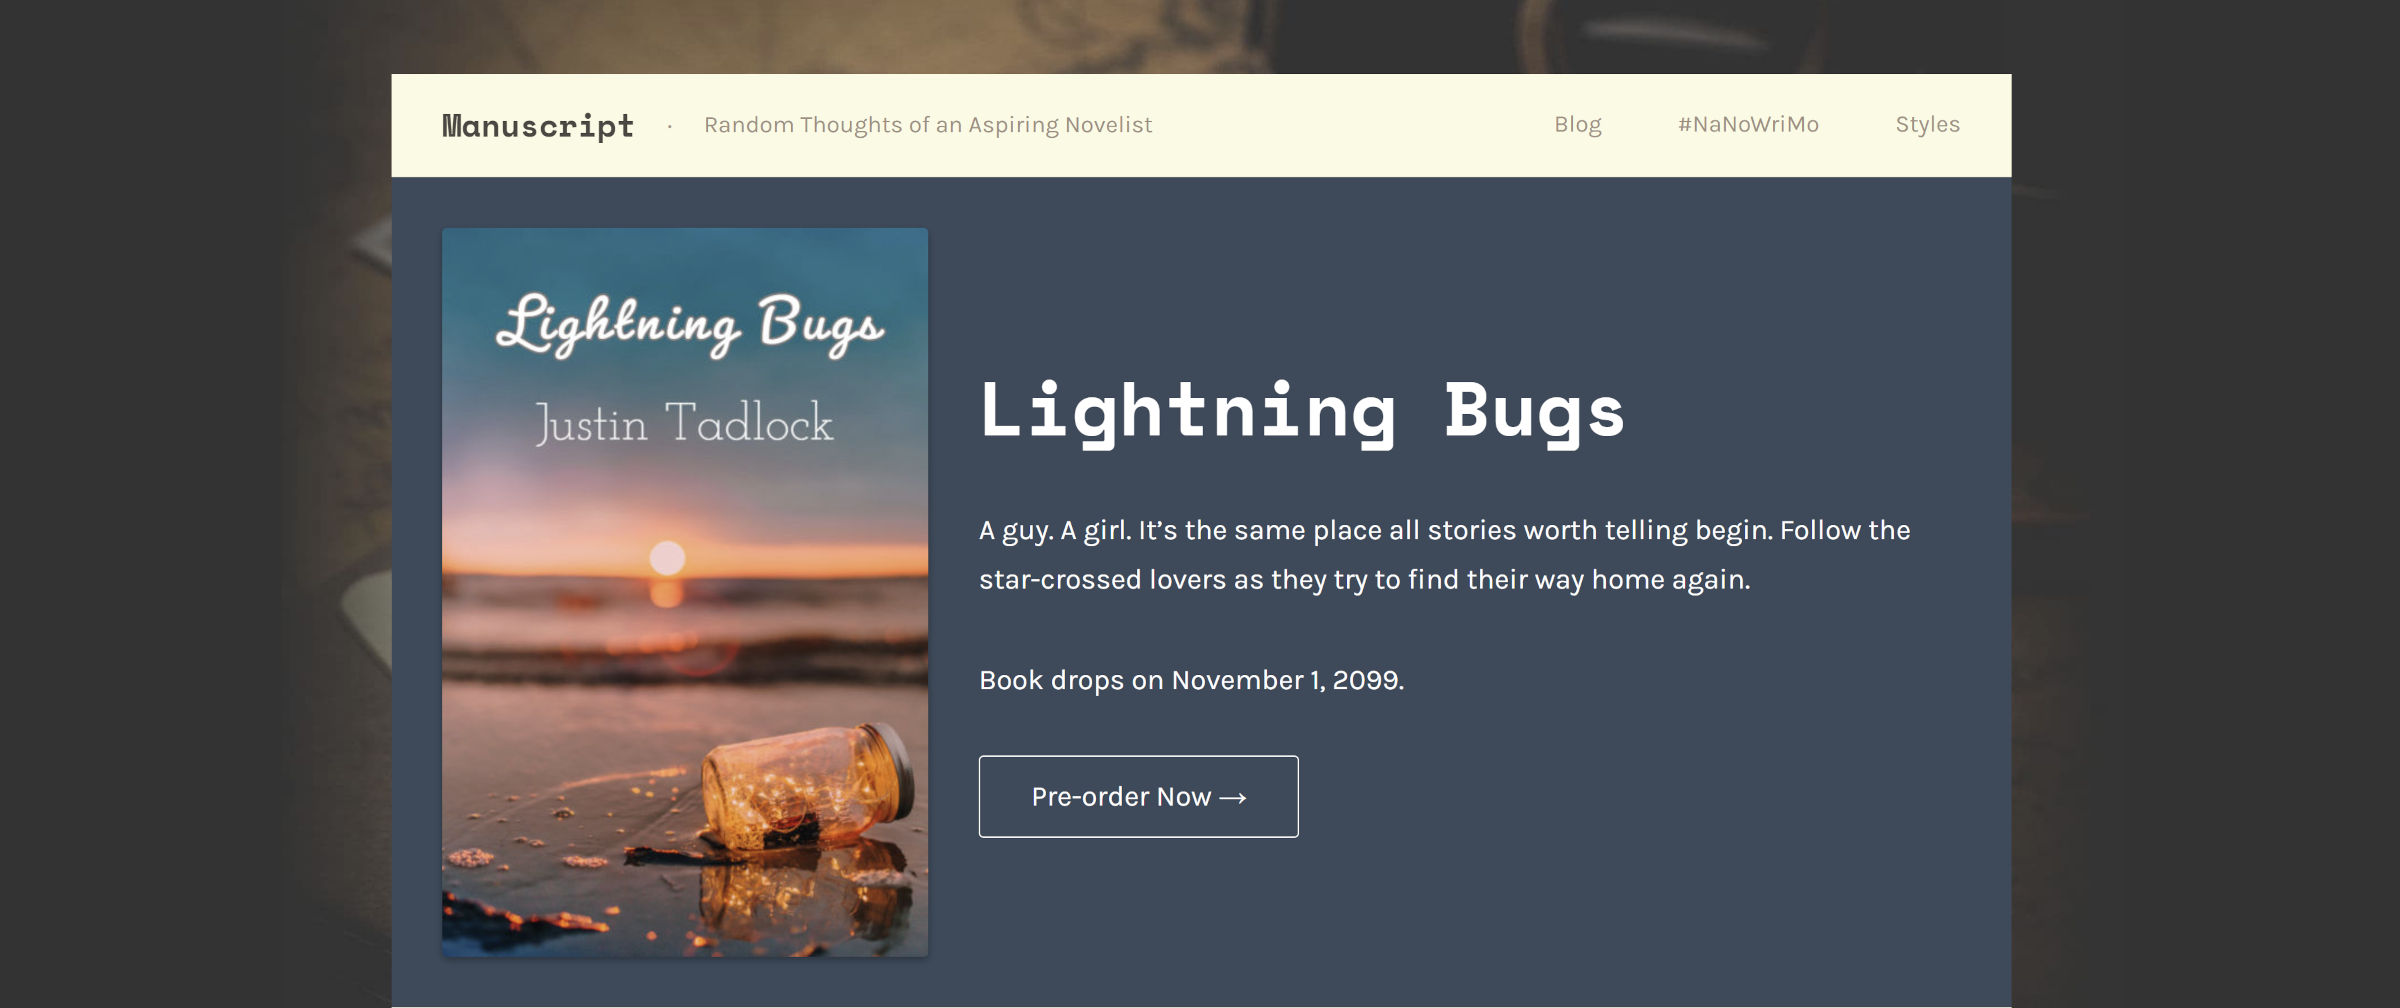
Book Card
This card is meant to be a starting point for authors who want to showcase one of their books, but it could be applied to any product. There are 1,000s of ways you could alter this, and I encourage everyone to customize it once they have walked through the steps. The end result should look similar to the following:

The final block HTML code is available via Gist. You can copy and paste it into the editor, but I encourage you to try building from scratch the first go-round. This series is all about learning to build with blocks. The copy-ready code is there just in case you get stuck.
Step 1: Container Group (optional)

Almost as a rule, I start with a Group block when building patterns or sections of blocks. I chose to add it this time because I wanted a dark background with some padding around the card’s content. You may opt-out of this if you prefer.
Once the block is in place, add text color, background color, and padding to the block. I chose 2rem for the padding because my active theme’s default is not consistent on all sides.
Step 2: Adding Media

One of my favorite blocks in WordPress is Media & Text. It has so many use cases, and it is sort of like a mini pattern all on its own. On one side, you drop in your media. On the other, you add whatever content you want.
Inside the Group block from Step 1, insert Media & Text. Go ahead and grab an image of your choosing. The WordPress photo directory has plenty if you do not have one on hand.
The only alteration I made to this block is to set the “Media width” option to 35 in the block options sidebar. Depending on the dimensions of your image, you may choose another option. Just be sure to give room for your content.
Step 3: Group (optional)

Inside of the Media & Text block, I added another Group. It enables consistent spacing, which WordPress does not apply to the “content” area of the Media & Text block for some reason. This is an optional step, but it provides more control over the design.
If you do not feel good with the spacing of your theme, you can change the “Block spacing” option in the block options sidebar. I adjusted this to 2rem, but it will depend on the active theme.
As an aside, these are details I rarely see mentioned in other tutorials—the “gotchas” and other problems that you might encounter. I feel like they are helpful inclusions but can be a bit of a bore. Feel free to let me know in the comments if you want me to continue covering this level of detail.
Step 4: Card Content

The final step in creating the book card should be relatively straightforward. I included a Heading, two Paragraphs, and a Buttons block. I encourage experimentation.
I made no changes to the Heading and Paragraph blocks. However, I selected the “Outline” style for the lone Button.
And, that is it! The inclusion of the built-in Media & Text block made it easier than building with others. Continue reading if you prefer reviewing books to writing and selling them.
Book Review Intro Card
This walkthrough will take you through creating a book review (or review intro) card. Like before, you can snag the full block HTML from Gist. The result should look a little something like the following:

With all the fuss over the previous recipe card tutorial, let me preface this section with a quick note. This tutorial series is about learning to build with blocks, not creating fleshed-out solutions for every possible scenario.
For those folks who want more, there are existing solutions. Donna Peplinskie’s Book Review Block is an excellent choice. It has ISBN integration, review Schema, and plenty of other bells and whistles. I even wrote about it back in 2020.
This is for the sometimes book reviewers, people not starting a review site, or those who just want to pick up a tip.
Steps 1-3: Rinse and Repeat

These steps are literally the same as the book card above: add a Group block, add Media & Text, and nest another Group inside the content area. The only change I made was to widen the Media section to 40 (it was 35 before).
Feel free to mix this up and try new things. Skip the initial Group block if you do not want the padded background.
Step 4: Card Content

Like the earlier book card, add a Heading block for the book title. This goes within the Group nested inside of the Media & Text block.
The next part of the content is where things divert. For the book “info,” you must insert a List block. Then, fill in the details that you think are relevant, like so:
- ✍️ Written by Justin Tadlock
- 🔖 Tagged Adult Fiction
- 📚 Published by Words & Press
- 📅 Published on May 01, 2099
- 📃 599 Pages
- ⭐⭐⭐⭐⭐ / 5 Stars
I wanted to spice things up with a few emoji. If that is not your thing, there is no need to include them.
In a real-world project, I would also include a “no marker” style for the List block, allowing the emoji to act as faux bullet points. However, the theme I was testing with did not have a style for this.
That brings us to the final section. I like to kick off book reviews by including a favorite quote. It gets me in the mood for writing about the book and lets me share something from the author. Therefore, I opted for placing a Quote block as the final piece.
An alternative might be a quick summary. You might even simply dive right into the review from there or leave the space empty. It is your card, and you can do what you want with it.
Not a bore at all, it’s the main reason I read this series. Anyone can click around a WYSIWYG editor, I’m here for the hangups and workarounds I’d otherwise only glean after dozens of hours trying to nail a specific client. Moreso with how fast GB keeps iterating.