 Font Awesome is an icon font comprised of 369 scalable vectors that can be customized via CSS to change the size, color, add drop shadows, adjust opacity, etc. Though originally designed for Twitter Bootstrap, the font is available for use within any project. These icons have fewer compatibility issues because they don’t require JavaScript. They also look great on retina displays because the font is made up of vectors that can scale to any size.
Earlier this year the Font Awesome icon font wasn’t allowed in the WordPress Plugin Repository due to its licensing. Plugins that loaded the font were closed down. Finally, in May of 2013, WordPress removed the ban on Font Awesome after it updated its license to be open source and GPL-compatible.
Plugin and theme developers are now free to make use of the font in their extensions, provided they don’t load from a CDN. Font Awesome 4 Menus is one of the newer plugins that include the icon font. It replaces an older version that had fewer features. This plugin makes it possible to add icons to WordPress menus without having to adjust any markup or know any CSS. The process is very easy and we can do it in three simple steps.
Step 1: Install Font Awesome 4 Menus Plugin
The Font Awesome 4 Menus plugin loads the icon font on your site so that you can make use of it within your menus and content. Add it to your WordPress site via the Plugins >> Add New menu. There are no settings to adjust for this plugin.
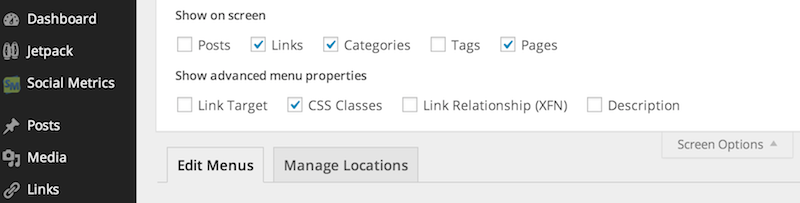
Step 2: Show CSS Classes Options on Menu Screen
When you navigate to Appearance >> Menus and edit individual menu items, you’ll need to make use of the “CSS Classes” option. This can be toggled on using the “Screen Options” menu at the top of the page.
Step 3: Enter the CSS Class for the Menu Icon
The last step is to locate the CSS class for the icon you want to use and paste it into the CSS Classes field for the menu item you want to update.
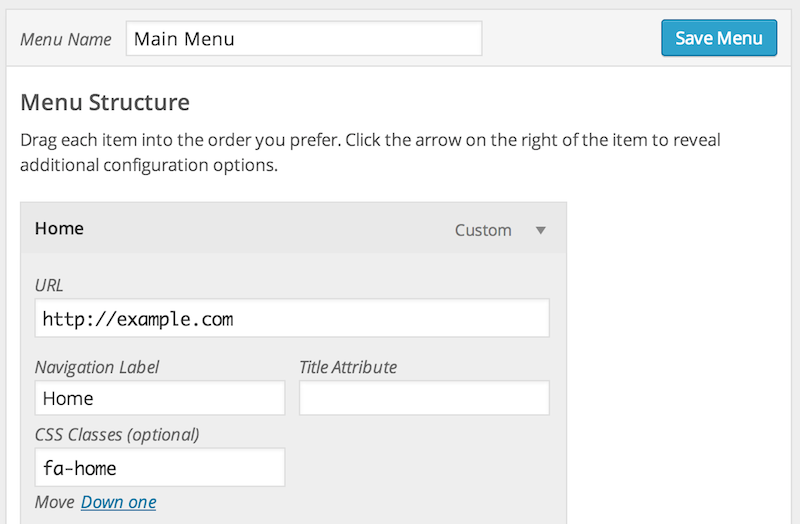
You can find the CSS class for your icon on the Font Awesome homepage or by using the the cheatsheet. Each is prefixed by “fa-” to differentiate from any other common classes that may already be in use.
Here’s the end result with icons added for each item in the menu:
In addition to adding icons to menus, Font Awesome can also be used in your WordPress content via a shortcode included with this plugin:
[fa class="fa-home"]
The plugin also allows for loading stacked icons, which is a new feature in the most recent Font Awesome 4 release. Here you can see an example of loading multiple icons on top of each other:
[fa-stack][fa class="fa-square-o fa-stack-2x"][fa class="fa-twitter fa-stack-1x"][/fa-stack]
![]()
You can also use plain old HTML within your theme or content to display the icons. However, I’d caution that if you’re wanting to use the icon font heavily throughout your content, you’re much better off not using a plugin. In case someday the plugin is no longer maintained, you’ll be in a better place if you add Font Awesome manually.
The Font Awesome 4 Menus plugin was created by the folks at New Nine and you can check out a live example on their website. The plugin loads one minified stylesheet (18kb) to load the fonts, so you shouldn’t experience a performance hit on desktop or mobile if you opt to use the icon font on your site. I tested it last night and found that it works just as expected. Download Font Awesome 4 Menus for free from the WordPress plugin repository.
[…] How to Add Font Awesome Icons to WordPress Menus […]